|
|
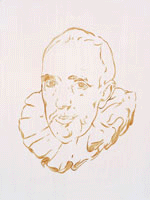
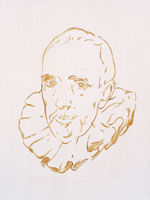
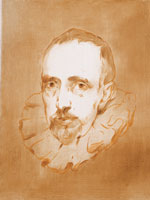
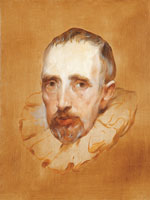
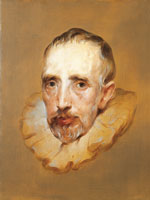
Flemish painters like Sir Peter Paul Rubens and Sir Anthony van Dyck were able to lay multiple layers of wet oil paint in a vertical position, one over the other, without moving the layers of paint below or causing them to bleed or run. The Old Masters of the 15th to the 17th century often painted with co-polymerized mediums like our Oil of Delft Linseed or Walnut painting mediums. The following copy of Frans Hals painting of Jacobus Zaffius by Frank Mason, in 2005, was completed using our Painting and Grinding mediums, Oil of Delft Linseed painting medium and Alchemist linseed amber varnish in one 5 hour setting.
These oil mediums and varnishes allowed for the application of one stroke of paint next to, or over, another without running or bleeding. The Old Masters added two types of varnishes to their paints: oil varnishes like our amber varnish made with linseed or walnut oil plus Baltic amber resin and essential oil varnishes made with balsams like Larch turpentine and solvents like spirits of turpentine.
Our amber varnishes are based on the recipes found in the 15th century De Ketham Manuscript B.M. Sloane 345 and on the recipes found in the 17th century De Mayerne Manuscript B.M. Sloane 2052.
These varnishes were added to oil paints to create various optical effects, increase luminosity, and harden and preserve the paint film. As a protective finish, our amber varnishes when applied to a painting are extremely flexible, and will not crack. Because amber varnishes cannot be removed when dry, using them to coat your paintings in tempera or in oil will render them impervious to solvents, eliminate the need for re-varnishing, and protect your work from damage by over-restoration.
This common painter's varnish, we market, is based on a recipe by Sir Anthony van Dyck found in the 17th century De Mayerne Manuscript.
The use of a one fits all medium for painting was foreign to the painters of the 15th and 17th centuries.
Often individual mediums and varying proportions of individual mediums were used when working with different pigments.
The way in which co-polymerized drying oil mediums and essential oil of varnishes were used is a newly discovered process of painting.
These mediums are based on the methods of painting that have been discovered from our 16 years of work with renowned oil painter Frank Mason and from our research of historical manuscripts on painting before 1700. Because this method of painting in oil does not reflect the modern method, it will be foreign to most painters.
|
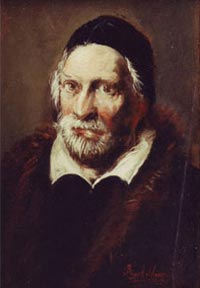
Frans Hals painting of Jacobus Zaffius, by Frank Mason, in 2005.
|
|
To ensure the successful use of these mediums it is important to keep an open mind and closely follow the directions for their use.
For those interested in exploring further the history and use of these mediums, the references upon which they are based have been listed in this article. Additional information on the history, use, and makeup of the Old Masters painting methods can be found in our book Including the First English Translation of the De Mayerne MS. B.M. Sloane 2052".
|
Instructions: Preparing the mediums
|
| |
Since these varnishes do not contain dryers, drying time will vary; exposure to the sun will greatly aid in the drying as suggested by 16th-century painters. Cobalt dryers of no more than 2% (6 drops of drier to every 10ml of unthinned varnish) can be added if the artist chooses to quicken the drying time. This is suggested for the following (slow drying) mediums and varnishes:
- Amber varnishes in Poppy and Walnut oil.
- Oil of Delft Painting medium in Walnut oil.
This fact should especially be taken into consideration by artists painting in damp climates or in basement studios.
|
|
|
Step-by-step instructions: Using the mediums
|
 |
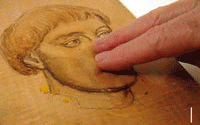
Allow Joseph H. Sulkowski to demonstrate the use of the mediums
The following copy of Sir Anthony Van Dyck's "Portrait of Cornelius van der Geest" as painted by the renowned American painter will serve as our example of how to apply several layers of wet paint in one sitting using our various mediums.
It is important to note while proceeding through the steps that the setting-up and drying times in a painting can vary depending on the absorbency of the canvas or panel grounds, as well as the atmospheric conditions and weather.
OUR MEDIUMS GO A LONG WAY: By adding our mediums to tube or dry colors on the palette with an eye-dropper, painters can attain great savings without sacrificing quality.
|
Joseph H. Sulkowski began his studies as a painter at the Pennsylvania Academy of Fine Arts. Subsequent studies at the Art Students League in New York from 1974-1979 led him to an apprenticeship with Frank Mason, Master Painter, and world authority on 17th century Flemish and Italian painting.
His work is now represented in public and private collections. He has received numerous awards including the AAPL Grand National Award, the Grumbacher Gold Medallion Award, and the National Arts Club Award.
(Painting copyright Pinxit Inc./Joseph H.Sulkowski)
|
Materials used in example:
|
Non-absorbent panel or canvas
Spray canvas with shellac or acrylic varnish spray. Lay flat to dry. This will cut down on absorbency.
Tube paints:
Alizarin Crimson
Cadmium red (light)
Cadmium red (medium)
Premixed gray value oil paint
Raw umber
Rose madder
Terra rosa
Terra verte
White lead or titanium white
Yellow ochre
Do not use washable oil paint
|
Brushes:
1 Bristle brush (Round)
2 Sable brushes (Soft)
(Due to the coarse nature of bristle brushes it is important to limit their use in the final layers in order to prevent the disturbing of the paint film.)
Mediums (all included in the Starter Kit):
Amber varnish
Amber varnish thinned (thinned with a solvent)
Linseed painting medium
Linseed painting medium thinned (thinned with a solvent)
Painting and Grinding medium
|
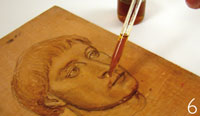
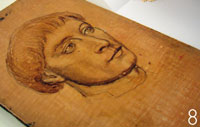
Step 1
First Joseph mixes the painting and grinding medium with some yellow ochre* until he has achieved an ink-like solution.
Next he dips his round bristle brush into this mixture and proceeds to define the linear aspects of his under-drawing.
The non-absorbent nature of his gesso ground enables this process to proceed much faster than if his ground were semi absorbent.
*Dry pigment ground in oil could also be used where tube paint is indicated here and elsewhere.
|
 |
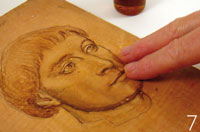
Step 2
Joseph waits around 15 to 20 minutes until his under-drawing sets up, or when he feels a drag on his brush. He then proceeds to mix some raw umber with painting and grinding medium into an ink-like solution. With this color mixture he begins to mass in the large areas of shadow and also to reinforce the bone structure of the head. Next he gently spreads his umber-saturated medium over the background establishing a transparent atmospheric tone.
|
 |
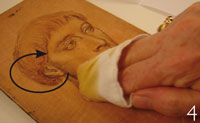
Step 3
Next Joseph masks in the light areas of his portrait using the following colors: white lead or titanium white, yellow ochre, cadmium red light, and a premixed gray value oil color. Each of these colors has been prepared by mixing a small amount of painting and grinding medium into them.
Joseph uses a mixture of white lead or titanium white and yellow ochre to model the subjects forehead. He then mixes some cadmium red (light) and gray into the white lead and yellow ochre to refine the flesh tones. Once these layers are mixed with the painting and grinding medium whereby he feels a drag on his brush, he then mixes some cadmium red (medium) with some of the linseed painting medium thinned and gently glazes over the lips.
By mixing a small amount of light gray value oil color with some linseed painting medium thinned, he gently applies some small strokes of gray paint to the beard and hair on top of the transparent paint layers below. Here the painter will find that he is able to apply a second and third coat of paint, wet-into-wet; without disturbing the layers below, remembering to periodically judge the receptivity between coats by the drag on his brush.
Joseph now premixes several values of skin tones from light to middle to shadows on his palette and into each of these premixed tones he adds one part linseed painting medium.
Note: Here some linseed painting medium thinned may also be used if preferred; or a small amount of amber varnish thick or thinned. With these colors he models the forms of the head including the eyes, nose, and mouth structures.
|
 |
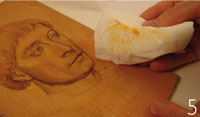
Step 4
After allowing 30-60 minutes, Joseph uses a soft sable brush to pass a layer of linseed painting medium over the surface.
At this stage of the painting you can add small amounts of the amber varnish or amber varnish thinned to obtain increased luminosity, an unsurpassed sense of depth and hardness of the paint film.
With another sable brush, Joseph picks up some flake white or titanium white (without any medium) and begins to draw the fine lines of the beard, mustache, and the highlights of the eyes. After he has worked up his painting from the mid-tones to the lights, he moves in the other direction and starts to refine his portraits transparent shadows using a mixture of raw umber, terra verte, and some terra rosa mixed with linseed painting medium. (As stated above, linseed painting medium, can be substituted with amber varnish.)
Then he mixes some alizarin crimson with some linseed painting medium and glazes the cheek, the bone at the tip of the nose, and the upper and lower lips. For finishing touches, Joseph reinforces his accents using touches of alizarin crimson and black mixed with a very small amount of linseed painting medium to touch up the corners of the mouth, nostrils, and pupils of the eyes.
Once the painting is dry the painter can put an ultra-thin coat of amber varnish thinned over the painting to protect and preserve the painting and to add an extra sense of depth.
.
|
 |
|
 |
Thanks to Artist Wayne Campbell we are also pleased to provide an instructional video on using the mediums
"Over the years I have painted mostly portraits in dry pastels. Until now, I am able to get the results I want using oils. Mixing your mediums with the oil paints lets me basically draw with the paint. Everyone should be using your Amber varnish and mediums, especially anyone with drawing skills and who has had trouble with the oil paint digging into the lower layers creating only mud."
Wayne E. Campbell |
|
|
|
 |
Allow the Alchemist to show how the Amber varnish is applied: Click below to see the Step-by-Step instruction.
All of these instructions are also shipped along with any order of the Starter KIt for those just getting started with oil painting with Alchemist mediums.
|
These amber varnishes can also be used as a final protective varnish for paintings executed in oil or tempera, for retouching and revitalizing old paintings, and for oiling-out or glazing existing areas of a painting.
Before applying our amber varnishes it is important that the surface of the painting is dry, clean and free of dust and dirt. In order to insure that your varnish does not bead up when being applied, and goes on smoothly without creating any tiny air bubbles, you should follow these directions. Alchemist Mediums do not contain any driers or solvents. For decreasing drying times please see the below.
 |
Step 1
Take some linseed or walnut oil and rub it on the surface of your painting.
|
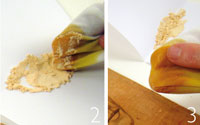 |
Steps 2 & 3
Mix some tripoli powder with either linseed or walnut oil to a paste and place it on an oil soaked rag.
|
 |
Step 4
Gently massage in a circular motion the surface of your painting. When you are done, wipe the linseed or walnut oil with the tripoli paste off of your painting making sure to leave behind a small film of oil.
|
 |
Step 5
Your painting is now ready to be varnished.
|
 |
Step 6
To apply your amber varnish to the prepared surface of your painting put some small drops of amber varnish on it and rub the varnish into the small film of oil on the surface of your work with your fingers.
|
 |
Step 7
Applying our amber varnish with your fingers will allow you to obtain an ultra thin coat and limit the amount of varnish you use. Additional leveling of the varnish surface can be achieved by going over the surface of the painting with a squirrel hairbrush.
|
 |
Step 8
Once you have applied a thin even coat of varnish allow your painting to dry.
|
Warning:
In order to avoid risk of fire due to spontaneous combustion it is important to wet down any linseed or walnut soaked rags and dispose of them.
Note:
Our amber varnishes applied to a painting when dry will create an oil film, which is extremely flexible, will not crack and is resistant to the action of solvents and alkalis.
|
|
Additional instructions:
FOR ICON PAINTERS
The use of amber varnishes as a coating for religious Icons in tempera can be found in Chapter 21 of the 11th century writings of the Monk Theophilus, entitled "Schedula Diversarum Artium. The second recipe in chapter 21 lists a hard resin as Fornis quid Romane glassa dicitur or amber. Many of the recipes in this manuscript have Byzantine origins
In keeping with the traditions established centuries ago our amber varnishes make excellent replacements for the "OLIFA", currently used by modern Icon painters.
In addition to their historical nature the optical effects, and protection that the amber varnish provide have distinct advantages over the use of "OLIFA" as a final coating over Icons in tempera.
Directions for applying our amber varnishes to Icons can be found under the heading of our website for protective coatings, in order to insure the proper and successful applications of our amber varnishes it is important the directions listed.
WET-OVER-DRY PROCESS
The process of applying an experimental layer of paint over a dried isolating layer of varnish can be repeated until the artist feels satisfied with the results. The creation of various optical illusions can be obtained by repeatedly applying individual layers of amber varnish over dried layers of oil paint.
USES OF AMBER VARNISH UNTHINNED
A small quantity of this amber varnish in the dark or clear versions should be added to general colors in either oil-based tube paints or dry ground pigments, such as those available from Kremer Pigments. If tube paints are used, the oil content should be minimized by laying the oil color on a paper towel before using. Apply these mediums as thin as possible. (See direction for applying varnishes.)
USES OF AMBER VARNISH THAT HAVE BEEN THINNED WITH SOLVENT
Our Amber Varnishes come in clear and dark versions and can be thinnend with solvents as directed and used as a painting medium, addition to tube colors and freshly ground colors in oil and as a final varnish for coating paintings in oil, tempera and for retouching and revitalizing old paintings as well as for oiling out and glazing.
INCREASING THE DRYING TIME OF OUR MEDIUMS
Multiple wet layers of the thick or thin versions may be applied, upon one another, in one session. If the process is interrupted or the painter revisits the work, the original layers should first be allowed to dry. This medium does not contain dryers and will dry in a few days under normal conditions. Exposure to the sun will greatly aid in drying. Dryers can be added by the painter to accelerate this process.
To speed up the drying time for Amber varnish Linseed, Walnut or Poppy oil, clear and dark (for painting only) Oil of Delft Linseed or Walnut painting medium, Baroque oil mastic painting medium or Oil of Delft Linseed or Walnut painting medium with amber.
Take no more than 2% cobalt or Japan drier or (6 drops of drier to every 10 ml of varnish), to thin the varnish add 1 part varnish to ¾ part of Spirits of turpentine (essence of turpentine) or spike of lavender.
|
|
|
|
|